QuayConnect API Tutorial
Welcome to the QuayConnect API tutorial. This section serves as an essential introduction to the core functionalities of our API. We will guide you through the process of creating shipments, managing products and contacts, as well as manipulating shipment data.
- Contacts
- Products
- Create
- Get
- Update
- Attach
Contacts
Contacts are crucial for creating shipments within our system. Once verified, these contacts can become parties associated with specific shipments. In this section, we'll guide you through the process of creating and managing them.
Creating a Contact
To create a contact:
- Access the 'Contacts' tab on the left side of your user interface.
- Choose 'Create New Contact' to start the contact creation process.
- Edit the contact details as needed, ensuring all necessary fields are accurately filled.
Here is an example of a properly filled contact to serve as a reference:
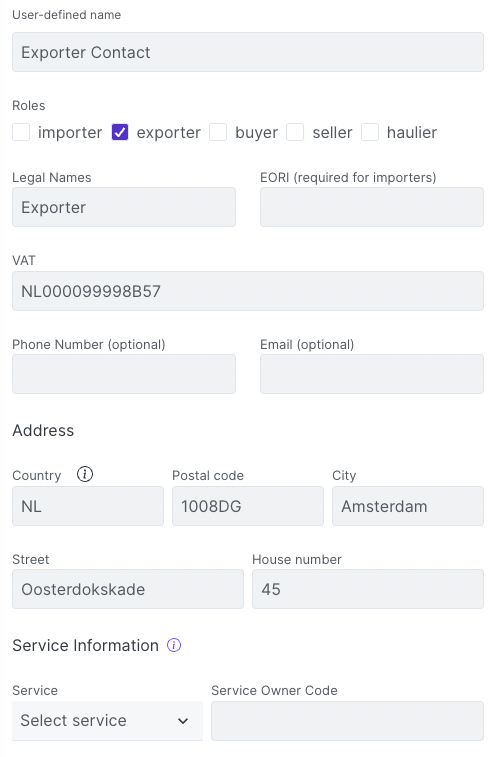
You can adjust the content as necessary and add the actual example contact details and a practical reference for your users.
Once administrators have verified a contact, it becomes readily available for use in your API requests.
Duplicating a Contact
From the 'Contacts' section, you can also duplicate a contact for ease of use or to create similar entries. To duplicate a contact, locate the contact you want to duplicate, then click the 'Duplicate' button.
Deleting a Contact
If you need to remove a contact for any reason, it's a straightforward process. Locate the contact you want to delete, then click the 'Delete' button. Please exercise caution when deleting contacts, as this action is irreversible.
Retrieving a Paginated List of Contacts
If you want to get a paginated list of your contacts, you can use the following endpoint. This endpoint allows you to specify the customer organization, page size, and page number. The default values for page size and page number are 25 and 1, respectively. Contacts are ordered by the date of creation in descending order (most recent first).
If you are an Intermediary organization, you can request to see the list of contacts of your clients by entering their organization domain.
Contacts of clients can only be accessed by Intermediary organizations. If a non-Intermediary organization attempts to access the contacts of another organization, a status code 401 (Unauthorized) will be returned.
Here is an example API request for retrieving contacts for my organization with a page size of 25 and the first page:
GET https://api.quayconnect.io/v2/shipments/contacts
Headers:
Authorization: Bearer your-access-token
Products
Products, while optional when creating shipments, offer exceptional utility in optimizing your logistics operations. By maintaining a list of products and their details, you can streamline the shipment creation process by associating a product code with each shipment.
Creating a Product
To create a product:
- Access the 'Products' tab located on the left side of your user interface.
- Choose 'Create New Product' to initiate the product creation process.
- Edit the product details as necessary, ensuring all required fields are meticulously completed.
- Click 'Finalize' to confirm and save the product information.
Here is an example of a properly filled product to serve as a reference:
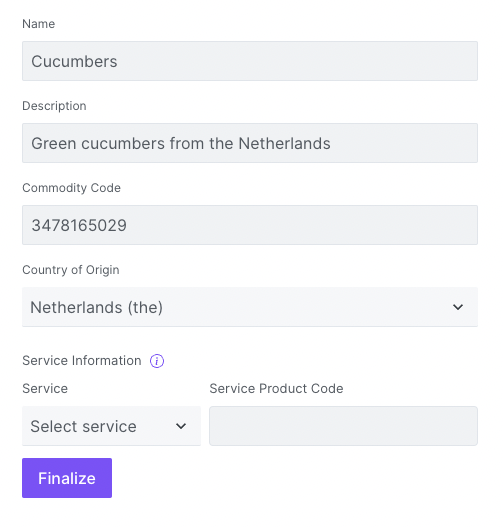
You can adjust the content as necessary and add the actual example product details and a practical reference for your users.
Once administrators have verified a product, it becomes readily available for use in your API requests.
Duplicating a Product
From the 'Products' section, you can also duplicate a product for ease of use or to create similar entries. To duplicate a product, locate the product you want to duplicate, then click the 'Duplicate' button.
Deleting a Product
If you need to remove a product for any reason, it's a straightforward process. Locate the product you want to delete, then click the 'Delete' button. Please exercise caution when deleting products, as this action is irreversible.
Retrieving a Paginated List of Products
If you want to get a paginated list of your products, you can use the following endpoint: 'endpoint'. This endpoint allows you to specify the customer organization, page size, and page number. The default values for page size and page number are 25 and 1, respectively. Products are ordered by the date of creation in descending order (most recent first).
If you are an Intermediary organization, you can request to see the list of products of your clients by entering their organization domain.
Products of clients can only be accessed by Intermediary organizations. If a non-Intermediary organization attempts to access the products of another organization, a status code 401 (Unauthorized) will be returned.
Here is an example API request for retrieving products for my organization with a page size of 25 and the first page:
GET https://api.quayconnect.io/v2/shipments/products
Headers:
Authorization: Bearer your-access-token
Creating a Shipment
With your contacts and products in place, you are now ready to initiate shipments using our API. You can create shipments in two distinct ways: using our native format or a non-native format, as agreed upon with administrators.
Types of Requests:
- Product Code-Based Request: For each product, you can enter product code and ommit the following fields: commodity code, country of origin and description.
- Detailed Description Request: If you prefer to provide details for each item or you have not created a product in the UI, you can include the entire product data.
You can use this method of shipment creation only if you have previously created a product and it has been verified by the administartors.
As an Intermediary organization, you have the capability to create shipments on behalf of your clients. To facilitate this, simply include a field named "onBehalf" within the JSON object when creating the shipment. For detailed specifications on using this field, please refer to our documentation here.
Creating a Shipment with Native Format
To create a shipment using the native format, you will require your API key and a JSON object that comprehensively describes your shipment. You can find the detailed specification for this JSON object in the endpoint description. An example request in this format is shown below:
POST https://api.quayconnect.io/v2/shipments
Headers:
Authorization: Bearer your-access-token
Content-Type: application/json

Request Body:
 See the details here
Creating a Shipment with Non-Native Format:
For those cases where a non-native format is necessary, you will still need your API key, but you will also require a file with an extension agreed upon with our administrators. An example request using an XML file is provided as follows:
POST https://api.quayconnect.io/v2/shipments/external
Headers:
Authorization: Bearer your-access-token
Content-Type: application/xml

Request Body:
 See the details here
Example Successful Response
If everything went smoothly, you will get the following response
                    {
                        "shipmentId": "string"
                    }
From now on, whenever you want to access your shipment data, alter it or attach the documents, you need to provide this shipment id.
Getting Shipment Data
This endpoint enables you to access information about your shipment. The response body is divided into three crucial parts: validation, export, and import.
Validation
The validation part provides feedback on the data you submitted by searching for potential errors. It can have three possible statuses:
- Success: Indicates that there are no errors, and the shipment has been successfully finalized.
- Pending: Indicates that the validation process is still ongoing, and you should await the results.
- Failure: Indicates that errors exist in your data, which need to be addressed before the shipment can be finalized.
Export and Import
The export and import sections will be included in the response only if your organization has previously enabled these services in the QuayConnect app. For each of these sections, you will receive:
- Status: Indicates whether the operation was successful.
- If successful, you will also receive:
- Document Type: Specifies the type of document generated.
- Document Number: Provides the document's unique identifier.
- Download Link: Offers a link for downloading the generated document.
- If the operation failed, you will receive an array of errors for further investigation and resolution.
To access shipment data via the endpoint, you must specify the unique ID of the shipment for which you want information. The shipment's ID will be provided to you in the response when creating a shipment.
Example API Request
GET https://api.quayconnect.io/v2/shipments/shipment-id
Headers:
Authorization: Bearer your-access-token
Example Successful Response
Upon successful handling of your request, you can expect to receive the following:
                    {
                        "validation": {
                          "status": "success",
                          "errors": [
                            {
                              "message": "string",
                              "slug": "string",
                              "fieldPath": "string"
                            }
                          ]
                        },
                        "export": {
                          "status": "success",
                          "documentType": "EU",
                          "documentNumber": "string",
                          "downloadLink": "string"
                        },
                        "import": {
                          "status": "success",
                          "documentType": "string",
                          "documentNumber": "string",
                          "downloadLink": "string",
                          "errors": [
                            {
                              "message": "string"
                            }
                          ]
                        }
                    }
Update Shipment
You can only make calls to this endpoint if your shipment has not been finalized, which means the status of your shipment validation should be 'failure'.
This endpoint serves the purpose of fixing any errors that may have occurred during the creation step of your shipment. The list of errors can be obtained by querying the validation section through the GET endpoint.
To initiate an update for your shipment, you'll need two key components:
- Shipment ID: This identifier is crucial for specifying the shipment you wish to update.
- New JSON Object: A new JSON object is required to represent the updated shipment. The structure of this object should mirror that used in the creation of shipments, following the same format.
Example API Request
PUT https://api.quayconnect.io/v2/shipments/shipment-id/update
Headers:
Authorization: Bearer your-access-token
Content-Type: application/json

Request Body:
 See the details here
If the update process is successful, you will receive a unique shipment identifier as confirmation.
Attach Document
This endpoint enables you to attach essential documents to your shipment. To utilize this feature, you'll require:
- Shipment ID: The unique identifier for the shipment to which you wish to attach documents.
- JSON Object Representing Your Document: Specific requirements and formatting details can be found in our endpoint description.
Example API Request
POST https://api.quayconnect.io/v2/shipments/shipment-id/documents
Headers:
Authorization: Bearer your-access-token
Content-Type: application/json
Upon successful document upload, you will receive a unique shipment identifier as confirmation.